How can I accept bitcoin on my website?
To use maximum control, click here.
To use minimum control click here.
Having maximum control over your money while accepting bitcoin.
Maximum control means there is no middleman between your buyer and yourself. You can use such a system as a point of sale (POS) inside your own business. If you are a freelancer, just send a link. As mentioned, the “https” in the domain of your website makes the transaction secure.
Using BTCPay to accept bitcoin payments.
Having full control over your money is the way most people want things. Looking at the steps below, this type of control requires some tools to get started.
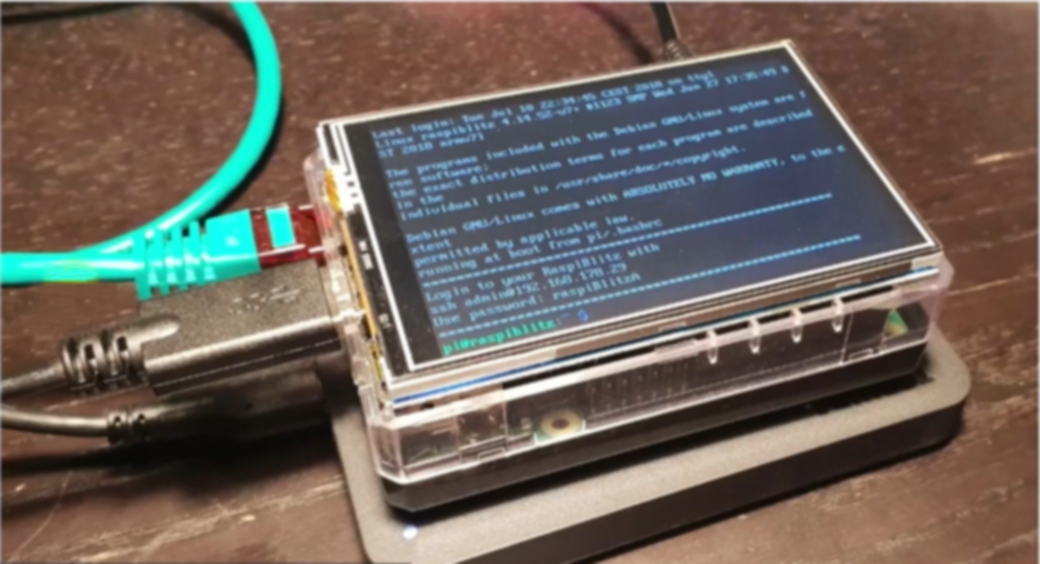
Get this for your setup:

The above is what you can use to receive bitcoin payments. It consists of these:
- Raspberry Pi 4 with 4GB RAM
- SD card (A minimum of 16 GB.)
- Official Raspberry Pi 4 USB-C Power Adapter. (A high-quality power adapter that puts out at least three amps.)
- Internal fan
- Heatsinks for the Raspberry Pi
- 500 GB harddrive (SSD is better. This will need to be upgraded to a bigger drive soon but will work for now.)
- Display (There are many to choose from.)
A Raspberry Pi case is optional, but many opt for one. There are many to choose from. The biggest objective will be a case that provides ventilation. If the little computer is going to be stuffed into a small space it will need to have fans and heatsinks. The three main enemies of electronics are heat, vibration and dust.
Here are recommendations for the above hardware, including the screen.
After getting the above hardware, it is time to get the the Raspberry Pi equipped with an operating system and then download the blockchain onto the hard drive. It will take a bit to get the whole blockchain onto the hard drive. Here is how to get an operating system onto your new computer:
–
–
–
Use minimum control over your money while accepting bitcoin.
Having less control means there is a middleman between your buyer’s payment and you. People use this option to avoid the complexity of creating a bitcoin node. Also, people are accustomed to this way of payment, since they use banks and places like Paypal every day. This method produces less overall privacy and security. Why? Third party payment gateways will always be the targets of hackers. Secondarily, you are forced to trust in how others feel about what you should do with your money. Thirdly, sometimes fees are involved.
Using Coinbase to accept bitcoin payments.
Coinbase has a wordpress plugin that works with woocommerce. The steps:
Install wordpress on your webhost.
After installing WordPress, login to your site and get acquainted with the menu items on the left of the administrator page. Go to “plugins” and “add new”.
Install Woocommerce
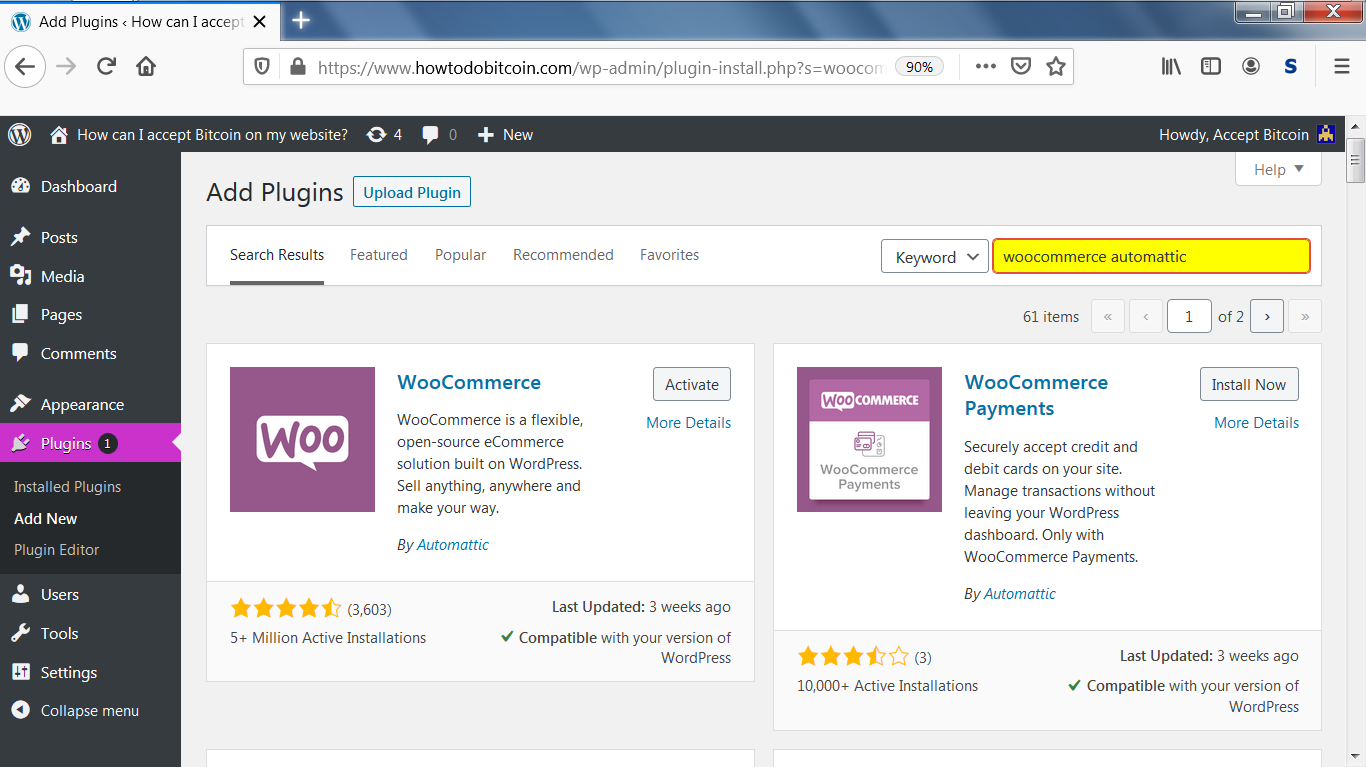
Start to install the Woocommerce plugin from Automattic by typing in “woocommerce automattic” in the search bar at the top right of the “Add Plugins” page.
In a few seconds, you will see the purple Woocommerce symbol (Woo) in the list of plugins. To be sure you are installing the right plugin, the words in the description will be, “WooCommerce is a flexible, open-source eCommerce solution…”. That is the right plugin. Install it in your WordPress site.
Install Coinbase
To Install the Coinbase plugin. Type in, “coinbase commerce” in the search bar at the top right of the “Add Plugins” page. In a few seconds the results will be listed. Choose the plugin that says: “Coinbase Commerce Payment Gateway for WooCommerce“. The rest of the installation of the Coinbase plugin will mirror your installation of the previous plugin. Note; “Coinsimple” is not the correct plugin to install.
Activate both plugins, Woocommerce and the Coinbase plugin.
Configuring the Coinbase Commerce plugin
Set up an account with Coinbase. Here is their site: https://commerce.coinbase.com/
Inside the WordPress administration menu, head to “WooCommerce”, then “Settings” and finally, the “Payments” page and you will see Coinbase in the table of payment gateways.
Those who are running a version of WooCommerce that is older than “3.4.x” will find the Coinbase Commerce menu is located at “WooCommerce”, then “Settings”, then “Checkout”.
Clicking the “Manage” button on the right will take you to the “settings” page. There you can configure the Coinbase plugin for your site.
Enable and disable payments
Turn the Coinbase Commerce payment method on / off for visitors at checkout.
The Coinbase plugin is able to periodically check for updates on payments from Coinbase. You will need to get an “API key” from your Coinbase account to do this. You can find it here: https://commerce.coinbase.com/dashboard/settings/
Your webhook shared secret
Using webhooks allows the Coinbase plugin to send payment confirmations to your website. To learn how to do this visit their page: https://commerce.coinbase.com/integrate/woocommerce
You are done! You can now accept payments on your website using bitcoin.
Using Bitpay to accept bitcoin payments.
Bitpay also has a wordpress plugin that works with woocommerce. The steps:
Install wordpress on your webhost.
After installing WordPress, login to your site and get acquainted with the menu items on the left of the administrator page. Go to “plugins” and “add new”.
Install Woocommerce
Start to install the Woocommerce plugin from Automattic by typing in “woocommerce automattic” in the search bar at the top right of the “Add Plugins” page.
In a few seconds, you will see the purple Woocommerce symbol (Woo) in the list of plugins. To be sure you are installing the right plugin, the words in the description will be, “WooCommerce is a flexible, open-source eCommerce solution…”. That is the right plugin. Install it in your WordPress site.
Sign up for a BitPay merchant account. Go to: https://bitpay.com/dashboard/signup . You will be asked how much profit your business makes on the signup page.
After installing Woocommerce, it is time to install the Bitpay plugin. Start to install the Bitpay plugin by typing in “bitpay” in the search bar at the top right of the “Add Plugins” page. Select “BitPay for WooCommerce” and click on the “Install Now” button. To make sure you are getting the Bitpay plugin, the text in the description will say, “The most secure and fastest way to accept crypto payments.”.
After installation of the Woocommerce and Bitpay plugins, you should activate them both by going to the “Installed Plugins” page in your WordPress website and activating them.
After both plugins are activated, BitPay will appear in WooCommerce under “Settings” and then “Payments” section.
Plugin configuration
The configuration steps for the Bitpay plugin are:
Create an API token inside your BitPay merchant dashboard. Go to: https://bitpay.com/dashboard/merchant/api-tokens to do this. Login to Bitpay to do this step.
Login to your WordPress website and select the Woocommerce page. Have your website that you want to take bitcoin payments on open to this page and the Bitpay merchant dashboard on the Bitpay website open at the same time.
Inside the Bitpay account click on the “Add new token” button. Select a token label (for instance: WooCommerce), uncheck “Require Authentication” and click on the “add token” button. Copy the token value. You will need to paste this into your website. Now is the time to decide if you want to do test payments or want to “go live” with accepting bitcoin payments.
In your WordPress admin panel you should be on the “WooCommerce” page. Go to “Payments” and click on the set up button next to the BitPay payment methods
Paste the token value into the appropriate field of Woocommerce. If you want to make test payments, copy the “development” token from the https://test.bitpay.com page. Some call this the “sandbox environment” and again, it is the “development” token. The “production” token is to be copied and pasted from the Bitpay site into your WordPress site if you want to take live payments.
Inside your Woocommerce plugin page choose the endpoint, either “test” or “production” depending on if you are testing your setup or ready to accept clients.
Once finished, click the “save changes” at the bottom of the page in WordPress.
Bitpay charges a one percent fee to merchants. This fee can be charged to the buyer at the time of purchase.
You are now ready to accept bitcoin payments on your website with Bitpay.
Using Coingate to accept bitcoin payments.
Coingate is another option for accepting bitcoin on your website. Here are the steps to get started:
Install WordPress on your webhost.
After installing WordPress, login to your site and get acquainted with the menu items on the left of the administrator page. Go to “plugins” and “add new”.
Install Woocommerce
Start to install the Woocommerce plugin from Automattic by typing in “woocommerce automattic” in the search bar at the top right of the “Add Plugins” page.
In a few seconds, you will see the purple Woocommerce symbol (Woo) in the list of plugins. To be sure you are installing the right plugin, the words in the description will be, “WooCommerce is a flexible, open-source eCommerce solution…”. That is the right plugin. Install it in your WordPress site.
Install the Coingate wordpress plugin. Do this by going to the same page as before. Log into your WordPress backend. Go to “plugins” and click on “add new”.
Type in “Coingate” in the upper right hand blank of the “add plugins” page. In a few seconds you will see the blue Coingate emblem. To make sure you are installing the right plugin, the description will say, “The easiest and quickest way to accept Bitcoin, Litecoin, Ethereum and other cryptocurrencies…“.
Install it and activate it just like the Woocommerce plugin.
Inside your WordPress site go the admin page. Click on “Woocommerce”, then “Settings”, then click on the “Payments” tab at the top. This page is the, “Payment methods” page. Scroll down until you see the Coingate plugin. Click on the “Setup” button for the Coingate plugin. Although the plugin is active, you will still need to check the option for, “Enable cryptocurrency payments via CoinGate“. This is also the same page to paste in your authorization token. The blank that has, “API Auth Token” next to it is the right blank to paste in this code.
Get an account at https://coingate.com. Some verification will need to be completed to continue to use this plugin. Inside the Coingate account, you will be able to get the API Auth Token mentioned above to continue.
To practice with some test payments, be sure to check the “Enable Test Mode (Sandbox)” option at the bottom of the Coingate plugin page. To do this go to https://sandbox.coingate.com and use the API for practicing to receive test payments. This code is not the same code you will use when you want to take “real” payments. This is a test mode and separate from the authorization token you will use when your website is taking real bitcoin payments.
When you are ready to “go live” uncheck the the “Enable Test Mode (Sandbox)” option. Get a “live” authorization token from your Coingate account. Copy and paste the code (token) into your Coingate plugin page. You are now ready to accept bitcoin payments on your website with Coingate.
